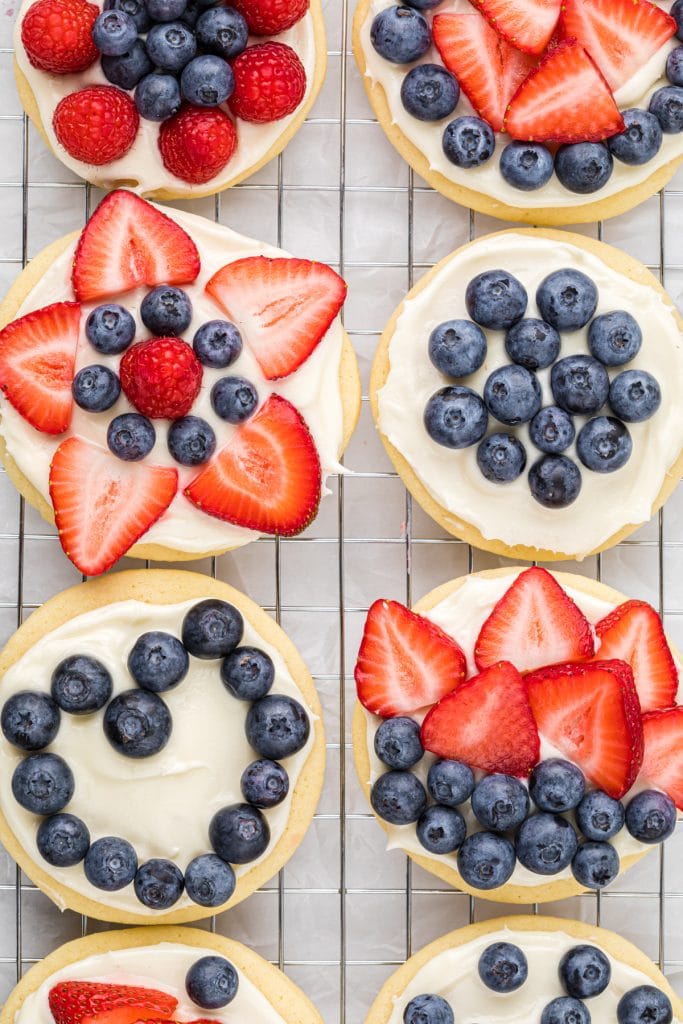
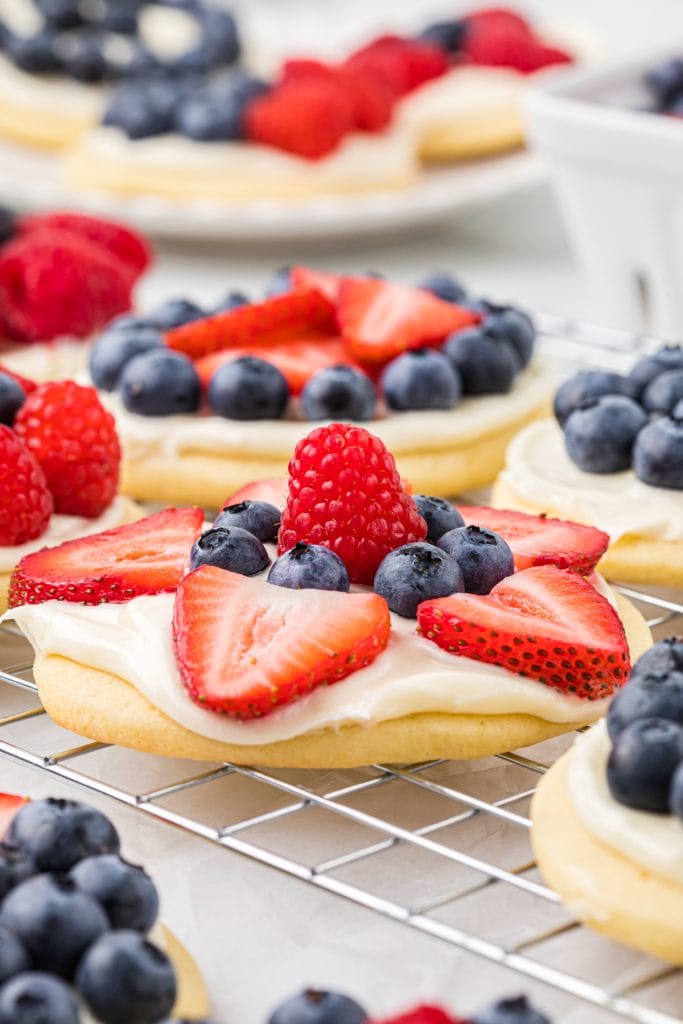
These Fruit Pizza Cookies with Berries have a sugar cookie base, cream cheese frosting, and an assortment of berries as a decorative topping. Decorating the cookies is fun for kids and adults alike, it’s a great group or family activity, and a perfect 4th of July or summer treat.
What we love about these Fruit Pizza Cookies
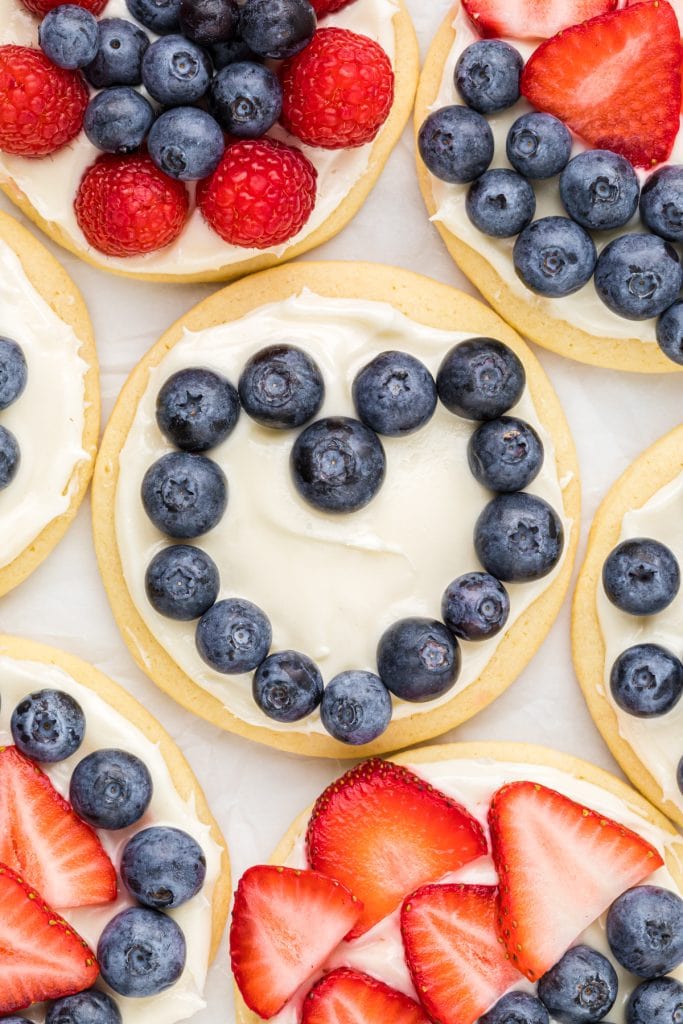
These cookies are fun to make and delicious to eat. We love everything about them! The sugar cookies are delicious on their own or with frosting. The cream cheese frosting has a touch of lemon, vanilla, and cream and has great flavor. Add the berries and you have a fun and scrumptious cookie. You can be as creative as you want with the designs of the berries. You can, of course, use other fruit as well, but we love the red, white, and blue of the berries and the taste of the berry combinations.
We actually think they are best chilled. There is something about both the texture and taste of the frosting and the cookie that improves slightly after chilling for at least an hour. They taste great right when they are made, but try chilling any leftovers, even the next day, and you will see. The cut strawberries may slightly weep by the next day, but the whole berries stay looking fresh.
Looking for another summer dessert? Try our favorite Cream Cheese and Strawberry Pie, our flavorful Old-Fashioned Blueberry Cobbler, our classic Strawberry Glazed Pie, or our delicious Cherry and Cream Cheese Pie.
What you need to make these Sugar Cookie Fruit Pizzas
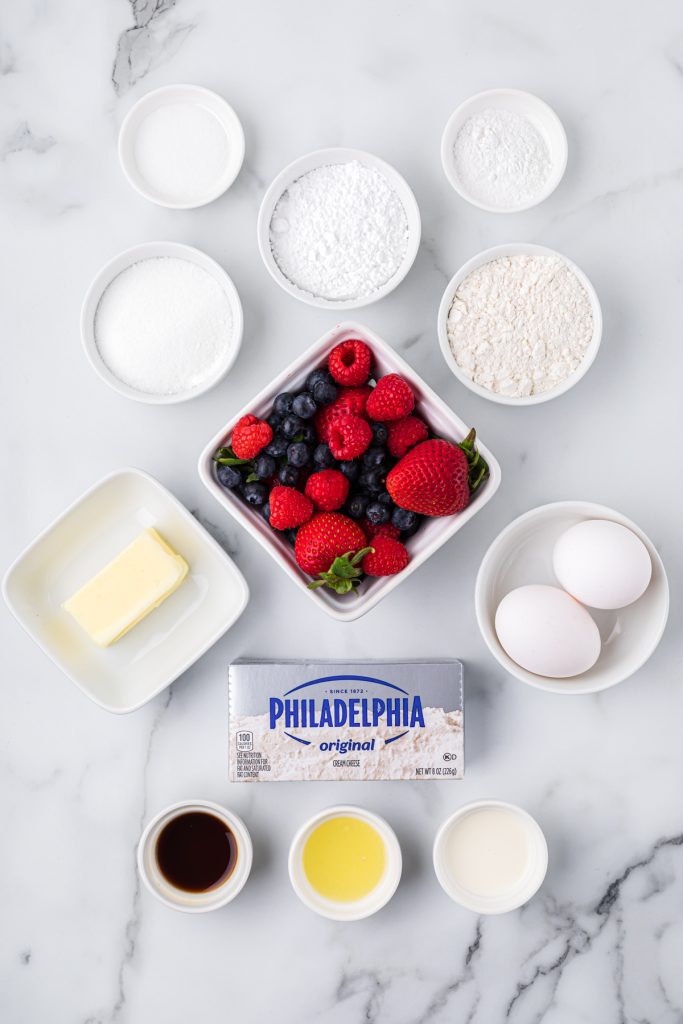
You will need the following ingredients:
- All-purpose flour
- Baking powder
- Salt
- Granulated sugar
- Butter
- Eggs
- Vanilla
- Cream cheese
- Powdered sugar
- Heavy whipping cream, half-and-half, or milk
- Lemon juice
- Berries (we used sliced strawberries, blueberries, and raspberries)
Fruit Pizza Cookies Substitutions
I know what it’s like when you don’t have everything on hand, and the last thing you want to do is run to the store and pick something up. Here are a few ideas to substitute items on the ingredients list if needed:
- You could use store-bought cream cheese or vanilla icing if you don’t want to make your own frosting.
- You could also substitute store-bought sugar cookie dough for the cookies if desired.
- You can use a whole variety of fruits to make the cookies. In addition to berries, try sliced kiwi, mandarin oranges, halved grapes, cubed pineapple, etc. Sliced bananas or apples could work too, only they would brown quickly.
Step-by-step Instructions
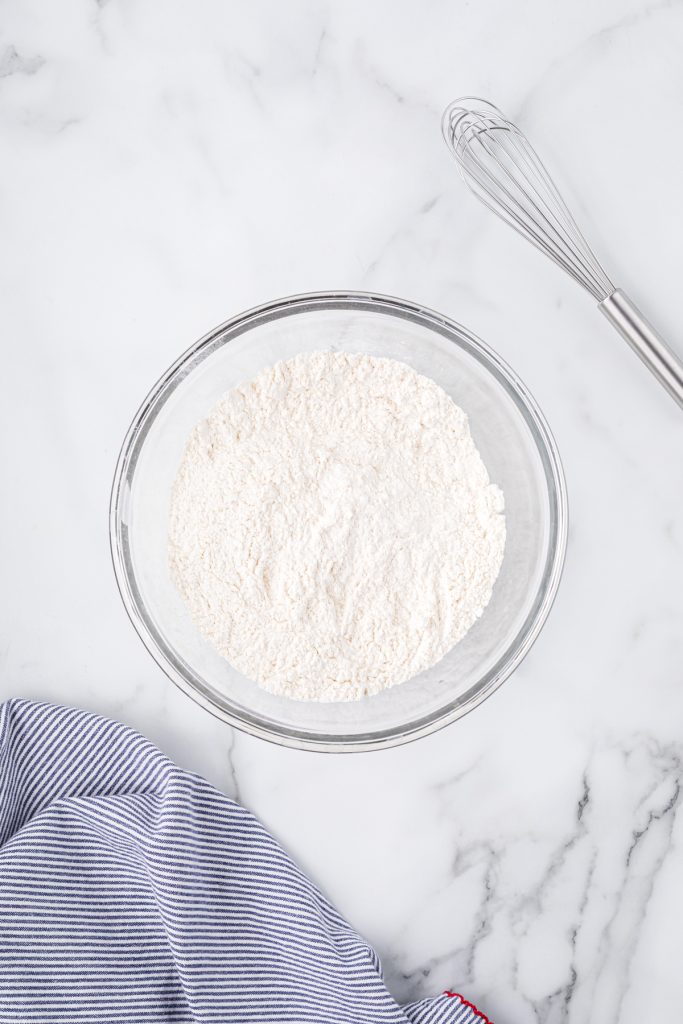
Step 1. In a small mixing bowl, whisk together flour, baking powder, and salt until just mixed. Set aside.
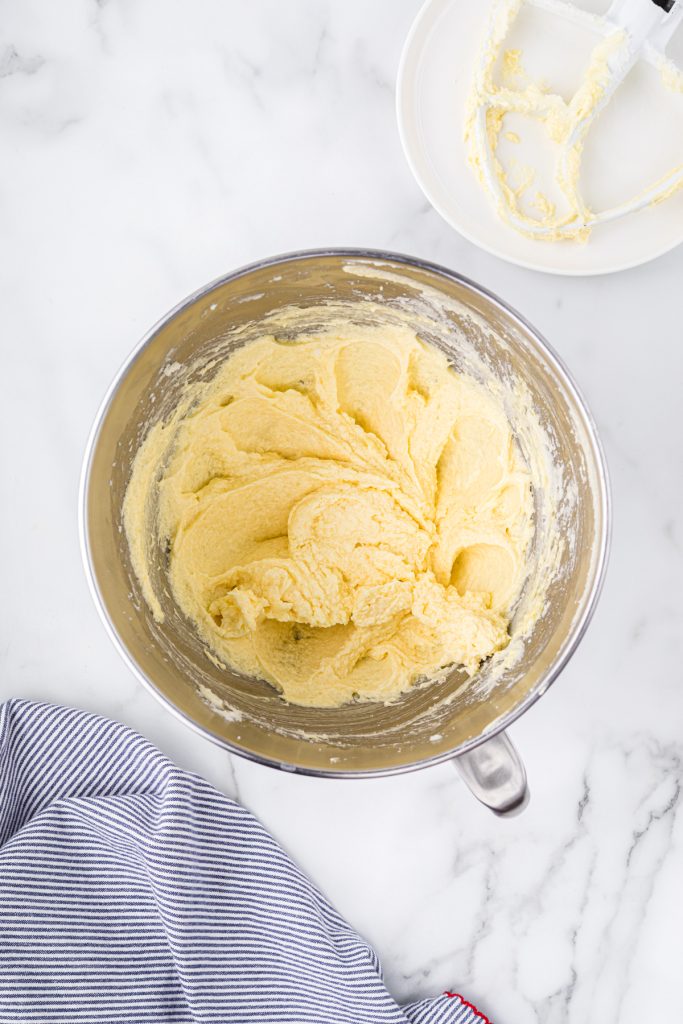
Step 2. In a stand mixer or with a handheld mixer in a large bowl, beat together butter and sugar for 3 minutes until fluffy. Add eggs, beating in one at a time, scraping down the edges of the bowl in between each egg addition to ensure the dough is evenly mixed. Add vanilla and mix until fully incorporated and smooth.
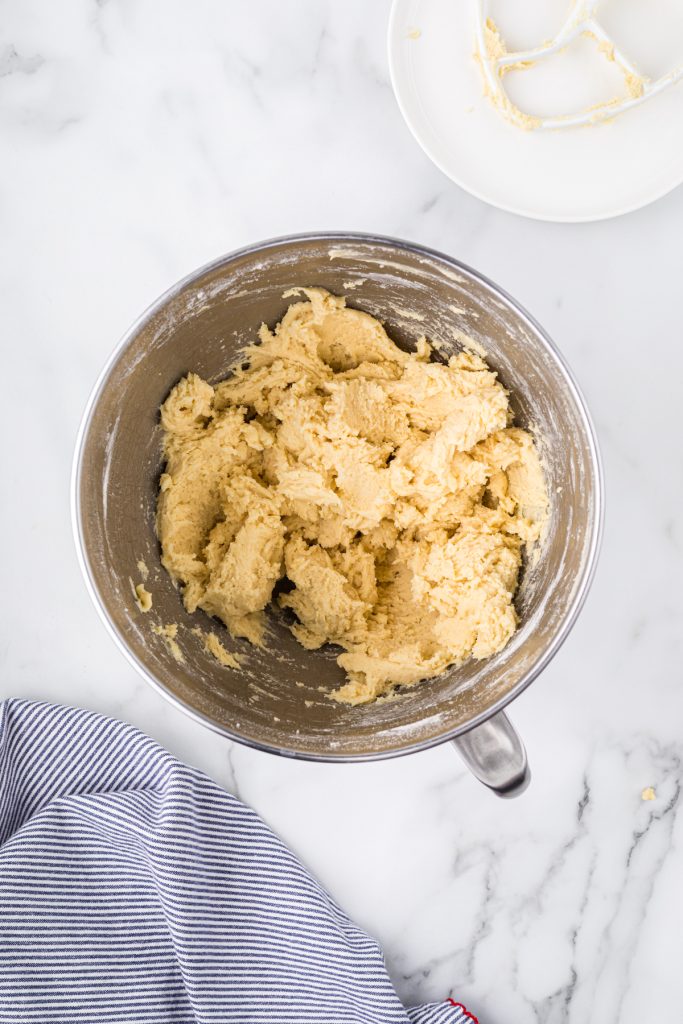
Step 3. Add the flour mixture to the dough, mixing until just combined. Cover the bowl with plastic wrap and chill the dough for at least one hour and up to 24 hours.
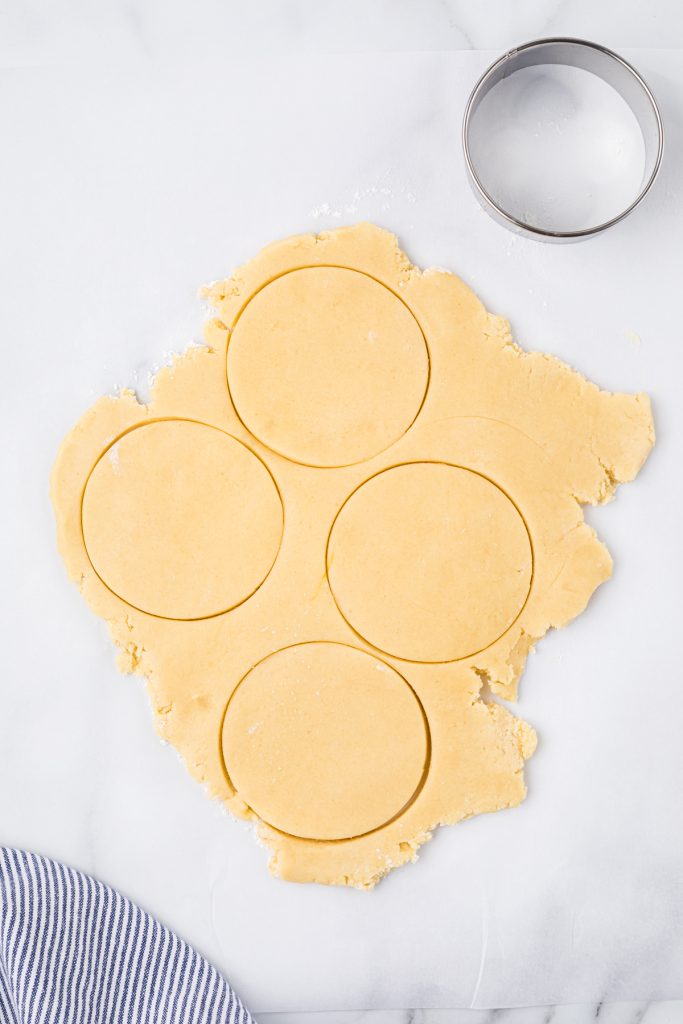
Step 4. Roll the dough out on a slightly floured surface ⅛ of an inch to a ¼ of an inch thick. Using a 3-inch cookie cutter (the bottom of a cup works as well), cut circles of dough and carefully place them on the prepared cookie sheets so they are at least an inch apart.
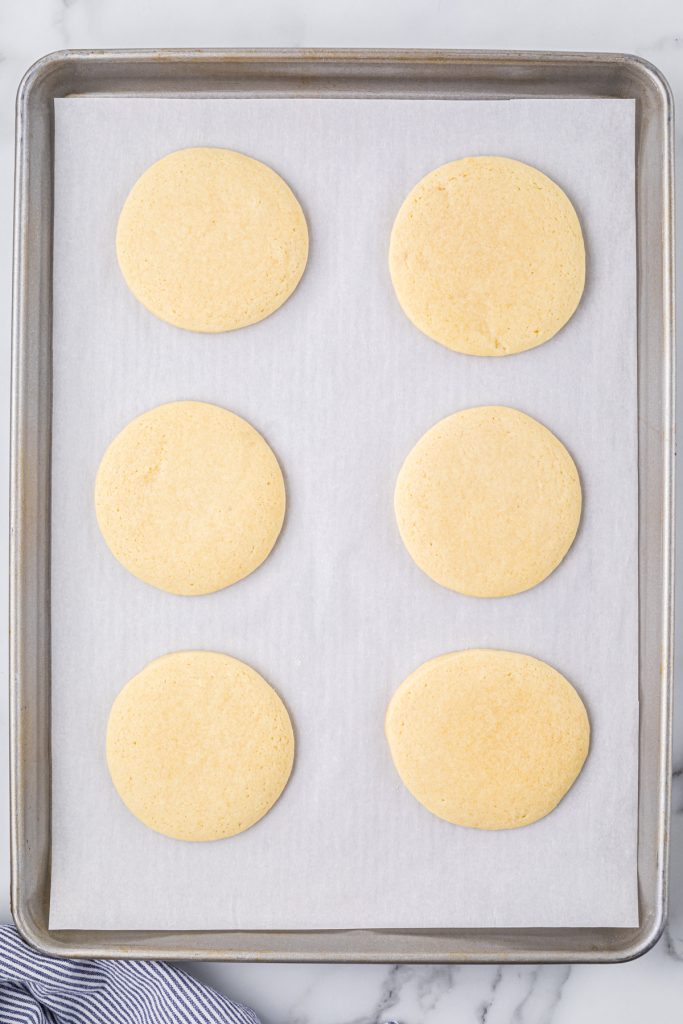
Step 5. Bake cookies for 10 minutes. The edges and bottom of the cookies may be slightly light brown. 5 minutes after the cookies have been removed from the oven, transfer them to a cooling rack to cool completely.
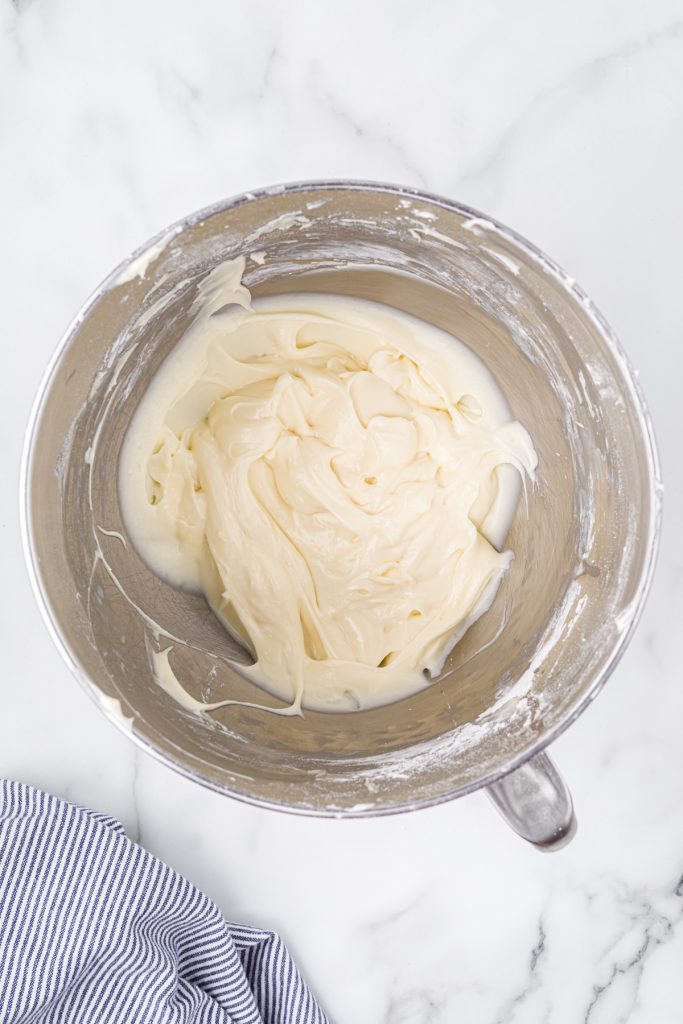
Step 6. In a stand mixer or with a handheld mixer in a medium-sized bowl, beat together butter and cream cheese until smooth and creamy. Mix in sugar, cream, vanilla, and lemon juice until completely incorporated. Frost the cookies with the icing. Add berries as a topping. You can be creative with making designs with the berries, or randomly place them on the cookies.
Tips

- We love these best after they have been chilled for at least an hour, and even until the next day. The sliced strawberries may start to weep a little by the next day, but the other berries remain looking the same.
- I love using this round cookie-cutter set. It comes with circles in a variety of sizes. I use this surprisingly often for cookies, and they are fun for homemade doughnuts as well.
As an Amazon Associate, I earn from qualifying purchases.
Frequently Asked Questions
| Can the cookie dough be made in advance? |
| a. The USDA says that cookie dough is safe in the fridge for 2-4 days. Sometimes I make the dough the day before, cover the dough in the fridge, and bake the cookies the next day. Before baking, keep the dough out at room temperature for about 30 minutes, or the dough will be hard to scoop. |
| How to store Fruit Pizza Cookies? |
| a. Store cookies in an air-tight container in a single layer in the fridge. The cookies without the frosting and berries will last in the fridge for 1-2 weeks, and in the freezer for 3 months. The cream cheese frosting and berries, however, shorten their shelf life. With the berries added, the cookies are good for 2-5 days in the fridge. Berries are delicate and can spoil quickly, especially when combined with moisture from the frosting. b. I don’t recommend freezing the cookies with the fresh berries and frosting added. The texture of the berries will be mushy and soft, and the texture of the cream cheese in the frosting can also become grainy after freezing. If you want to freeze the cookies, it’s best to freeze them without the toppings and add them after thawing when frozen. |

Fruit Pizza Cookies with Berries
45
minutes30
minutes14-18
cookies1
hour15
minutesThese Fruit Pizza Cookies with Berries have a sugar cookie base, cream cheese frosting, and an assortment of berries as a decorative topping. Decorating the cookies is fun for kids and adults alike, it’s a great group or family activity, and a perfect 4th of July or summer treat.
Ingredients
Cookies:
2 ½ cups all-purpose flour, spooned into measuring cup and leveled
1 teaspoon baking powder
½ teaspoon salt
1 cup granulated sugar
¾ cup butter, softened
2 eggs
1 teaspoon vanilla
Frosting:
8 ounces cream cheese, softened
2 tablespoons butter, softened
2 cups powdered sugar
1 ½ teaspoons heavy whipping cream, half-and-half, or milk
1 teaspoon vanilla
¼ teaspoon fresh lemon juice
3 cups berries (we used sliced strawberries, blueberries, and raspberries)
Directions
- Preheat oven to 350 degrees Fahrenheit and line two cookie sheets with parchment paper.
- In a small mixing bowl, whisk together flour, baking powder, and salt until just mixed. Set aside.
- In a stand mixer or with a handheld mixer in a large bowl, beat together butter and sugar for 3 minutes until fluffy. Add eggs, beating in one at a time, scraping down the edges of the bowl in between each egg addition to ensure the dough is evenly mixed. Add vanilla and mix until fully incorporated and smooth.
- Add the flour mixture to the dough, mixing until just combined.
- Cover the bowl with plastic wrap and chill the dough for at least one hour and up to 24 hours.
- If the dough was refrigerated for a longer period of time, let it rest at room temperature for about 30 minutes or more before rolling out. Roll the dough out on a slightly floured surface ⅛ of an inch to a ¼ of an inch thick. Using a 3-inch cookie cutter (the bottom of a cup works as well), cut circles of dough and carefully place them on the prepared cookie sheets so they are at least an inch apart.
- Gather the scraps of dough into a ball and roll out the dough, repeating until all of the dough is used.
- Bake cookies for 10 minutes. The edges and bottom of the cookies may be slightly light brown. 5 minutes after the cookies have been removed from the oven, transfer them to a cooling rack to cool completely. Once cookies are at room temperature, transfer cookies to a sealed container, or frost the cookies and decorate them with the berries.
- In a stand mixer or with a handheld mixer in a medium-sized bowl, beat together butter and cream cheese until smooth and creamy. Mix in sugar, cream, vanilla, and lemon juice until completely incorporated.
- Frost the cookies with the icing. I like using an offset spatula to help make the surface of the icing even and flat. Add berries as a topping. You can be creative with making designs with the berries, or randomly place them on the cookies.
- We recommend chilling the cookies for at least an hour for the best flavor, but you can also eat them immediately after frosting.
Notes
- The quantity of the cookies depends on the thickness of the cookie dough when rolled out and the size of the cookie cutter used. A 3-inch cookie cutter makes a slightly larger sugar cookie.
- I recommend lining your cookie sheet with parchment paper for even browning, to prevent spreading and sticking, and to help with clean up.
- To measure your flour, spoon the flour into a dry measuring cup and level off the top using a knife or straight-edged utensil for best results.
- It takes 30 minutes to 1 hour for butter to come to room temperature. I recommend just placing the butter on the counter to soften before making the cookies instead of softening the butter in the microwave where the butter can melt.


I believe I’ve found my favorite summer cookie recipe. They are just adorable and tasty.
Thank you so much! The berries are fun to decorate with and it really is a great summer treat. I appreciate the great feedback, thank you!
These are so cute and perfect for parties! Love these for summer!
Thank you so much! Decorating with the fresh berries is both fun and delicious, we enjoy these in the summer too! Thanks for stopping by and for the great feedback!
Love kids friendly recipes like these! Its a perfect way to engage the kids in cooking during the summer break.
Thank you so much! It really is a fun activity and treat at the same time. Thanks for the great feedback!
These were so fun! I ended up using black and red raspberries from the farmers market and they were perfect.
I bet these were beautiful with your fresh raspberries! I’m so glad you enjoyed them! Thanks for taking the time to provide great feedback!
The family & I are huge sugar cookie fans, so I had to make these for dessert. Everyone did their own custom cookies, which made it even more fun. Delicious!
I’m so glad to hear your family enjoyed decorating them together and making them! We have fun with this too. Thanks for the great feedback Karina!